Department/Office/Area/Branch/Installment Change Wireframes
NOTE :
1. Incase of single branch, the branch name should be autopopulated as a non editable field.
2. Incase of more than one branch, the branch name should be displayed as a combo box.
3. While list is displyed in combo box and text box for area, office, department, branch as "code and name" together.
Example :
* Area - "01 Mumbai"
* Office - "12 Colaba"
* Department - "10 Deposits"
* Branch - "32 Kothrud"
The 'Change Department/Office/Area/Branch' option of the 'Transactions' menu takes one to the 'Change Department/Office/Area'.


User story reference:U5101
NOTE : Branch name data should be auto populated based on folio(member) number entered for all screens mentioned below.
Change Department
By clicking on the "Department", you are provided with an option to select "Single Member" or "Department".
NOTE : When 'Department' radio button is selected - 'Office', 'Area' and 'Branch' radio buttons are inactive.

By selecting, single member option you are directed to the UI of single member. Here is the UI for the same.
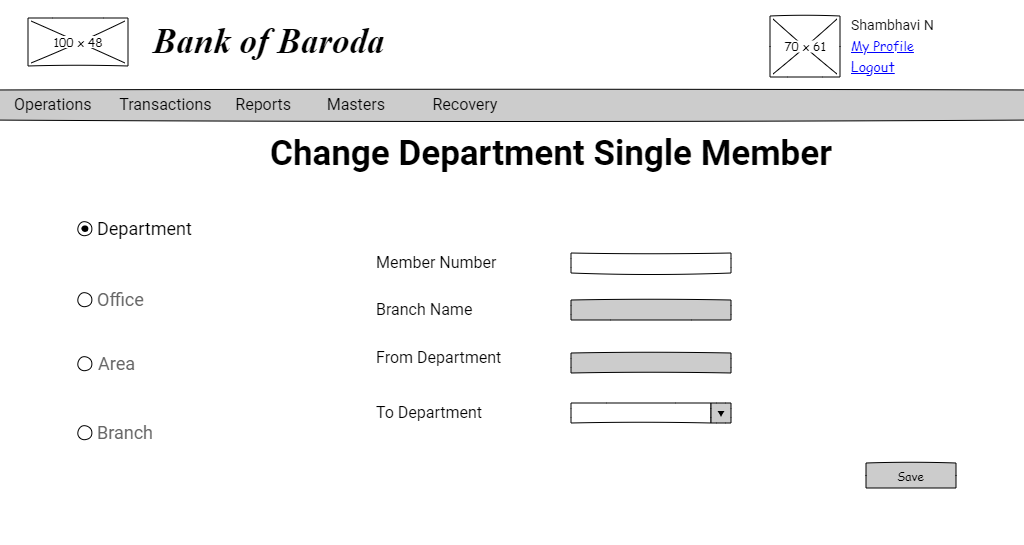
Enter the member number, 'branch name' and 'from department' data is automatically populated. Select the relevant 'to department'.
By clicking on the "SAVE" button, changes done for single member department goes through approval process.
By selecting the option department you are directed to the respective UI.

Select the 'branch', 'from department' and 'to department' details.
By clicking on the "SAVE" button, changes done for department goes through approval process.
NOTE: The 'from department' and 'to department' fields should never be the same.
Change Area
By clicking on the "Area", you are provided with an option to select "Single Member" or "Area".
NOTE : When 'Area' radio button is selected - 'Office', 'Department' and 'Branch' radio buttons are inactive.

By selecting, single option you are directed to the UI of single. Here is the UI for the same.
Enter the member number, 'branch name' and 'from area' data is automatically populated. Select the relevant 'to area'.

By clicking on the "SAVE" button, changes done for single member area goes through approval process.
By selecting the option area you are directed to the respective UI.
Select the 'branch', 'from area' and 'to area' details.

By clicking on the "SAVE" button, changes done for area goes through approval process.
NOTE: The 'from area' and 'to area' fields should never be the same.
Change Office
By clicking on the "office", you are provided with an option to select "Single Member" or "Office".
NOTE : When 'Office' radio button is selected - 'Area', 'Department' and 'Branch' radio buttons are inactive.

By selecting, single option you are directed to the UI of single member. Here is the UI for the same.
Enter the member number, 'branch name' and 'from office' data is automatically populated. Select the relevant 'to office'.

By clicking on the "SAVE" button, changes done for single office goes through approval process.
By selecting the option office you are directed to the respective UI.
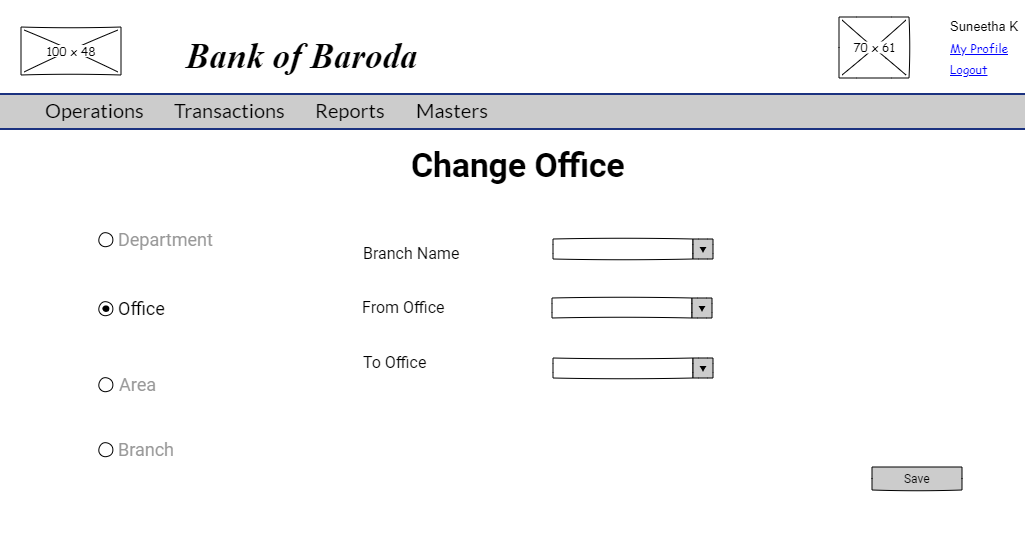
Select the 'branch', 'from office' and 'to office' details.
By clicking on the "SAVE" button, changes done for office goes through approval process.
NOTE: The 'from office' and 'to office' fields should never be the same.
Change Branch
By clicking on the "branch", you are provided with an option to select "Single Member" or "Branch".
NOTE : When 'Branch' radio button is selected - 'Area', 'Department' and 'Office' radio buttons are inactive.

By selecting, single option you are directed to the UI of single member. Here is the UI for the same.
Enter the member number, ' from branch' data is automatically populated. Select the relevant 'to branch'.

By clicking on the "SAVE" button, changes done for single member branch goes through approval process.
By selecting the option branch you are directed to the respective UI.
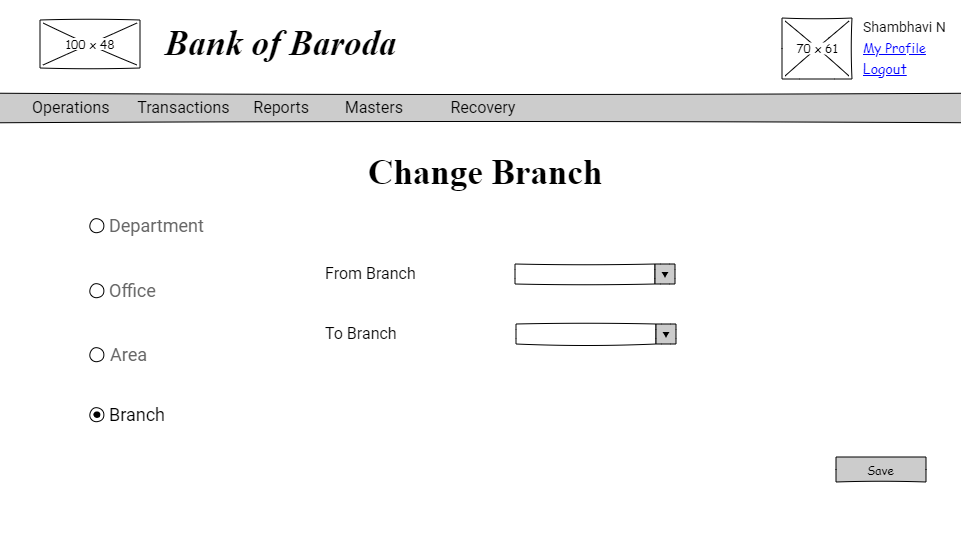
Select 'from branch' and 'to branch' details.
By clicking on the "SAVE" button, changes done for branch goes through approval process.
NOTE: The 'from branch' and 'to branch' fields should never be the same.
User story reference : U5102
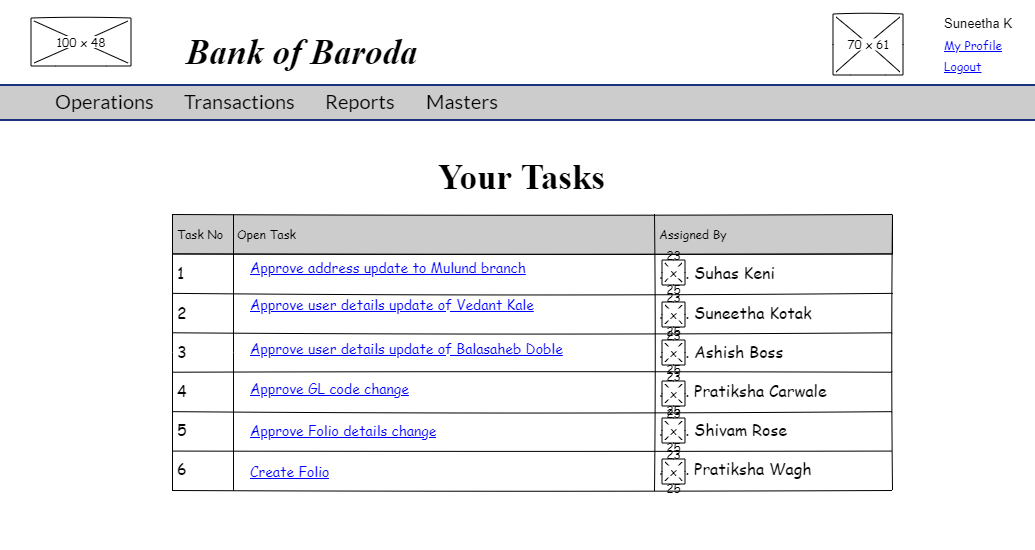
The approval task list will be visibe only to the user with responsibility to authorise a department/office/area change.
By clicking that you are taken to the list of tasks pending for approval.
Change Department Approve
When clicked on a particular task, are directed to approve department change page. Here is the UI for same.
Change department (single) approve UI.

Change department approve UI.

Note: When 'department' option is selected then the field "CHANGE TYPE" should be added with the value "D - Department".
Change Area Approve
When clicked on a particular task, are directed to approve area change page. Here is the UI for same.
Change area (single) approve UI.

Change area approve UI.

Note: When 'area' option is selected then the field "CHANGE TYPE" should be added with the value "A-AREA".
Change Office Approve
When clicked on a particular task, are directed to approve office change page. Here is the UI for same.
Change office (single) approve UI.

Change office approve UI.

Note: When office option is selected then the field "CHANGE TYPE" should be added with the value "O-OFFICE".
Change Branch Approve
When clicked on a particular task, are directed to approve branch change page. Here is the UI for same.
Change branch (single) approve UI.

Change branch approve UI.

Note: When office option is selected then the field "CHANGE TYPE" should be added with the value "B-BRANCH".
If "Approve" button is clicked, the changes made for department/area/office/branch is saved, for single department/area/office/branch or department/area/office/branch as applicable. You are redirected to approval task list page with an information message.
If "Reject" button is clicked, the changes made for department/area/office/branch is not saved, for single department/area/office/branch or department/area/office/branch as applicable. You are redirected to approval task list page with an information message.
NOTE : Whenever a change is approved for department/area/office/branch, the corresponding folio or folios (member or members) data should be updated for department/area/office/branch accordingly.
Branch Change Approve should be done by highest authority like a super user.
Please refer to create approve screen validations.
Change Installment
User story reference: U5101
The 'Change Installment' option of the 'Transactions' menu takes one to the 'Change Installment' page.
Here is the UI to enter change installment details.
NOTE : 1. The account type list must be auto-populated based on the folio(member) number.
2. If only one scheme id is available for the selected account type, then a text box should be visible for "Scheme ID" field.
3. If multiple scheme ids are available for the selected account type, then a drop-down list should be visible for "Scheme ID" field.

By clicking on "SAVE" button, the installment changes are captured and goes through approval process.
Change Installment Approve
User story reference: U5102
The approval task list will be visibe only to the user with responsibility to authorise an installment change .
By clicking that you are taken to the list of tasks pending for approval.
When clicked on a particular task, are directed to approve an installment change. Here is the UI for same.

If "Approve" button is clicked, installment changes done are saved. You are redirected to approval task list page with an information message.
If "Reject" button is clicked, the installment changes are not saved. You are redirected to approval task list page with an information message.
Please refer to create approve screen validations.
Stop Recovery Installment
User story reference: U5101
The 'Stop Recovery Installment' option of the 'Recovery' menu takes one to the 'Stop Recovery Installment' page.

Here is the UI to enter stop installment details.
The account type list must be auto-populated based on the folio(member) number.
If only one scheme id is available for the selected account type, then a text box should be visible for "Scheme ID" field.
If multiple scheme ids are available for the selected account type, then a drop-down list should be visible for "Scheme ID" field.
Please refer to date validations.

By clicking on "SAVE" button, the stop recovery installment details are captured and goes through approval process.
Stop Recovery Installment Approve
User story reference: U5102
The approval task list will be visibe only to the user with responsibility to authorise an stop recovery installment change .
By clicking that you are taken to the list of tasks pending for approval.
When clicked on a particular task, are directed to approve a stop recovery installment change. Here is the UI for same.

If "Approve" button is clicked, stop recovery installment changes done are saved. You are redirected to approval task list page with an information message.
If "Reject" button is clicked, the stop recoevry installment changes are not saved. You are redirected to approval task list page with an information message.
Please refer to create approve screen validations.